Connect Google Sheets to look up data during calls, log results after calls, and add contacts to agents from new rows.
The Google Sheets integration turns a spreadsheet into a live data source for your agents. Look up offers, prices, or customer records mid-call, write each call’s outcome to a log sheet, and add contacts to an agent whenever a row is added.
Open App Center, search for Google Sheets, and click +.
2
Sign in with Google
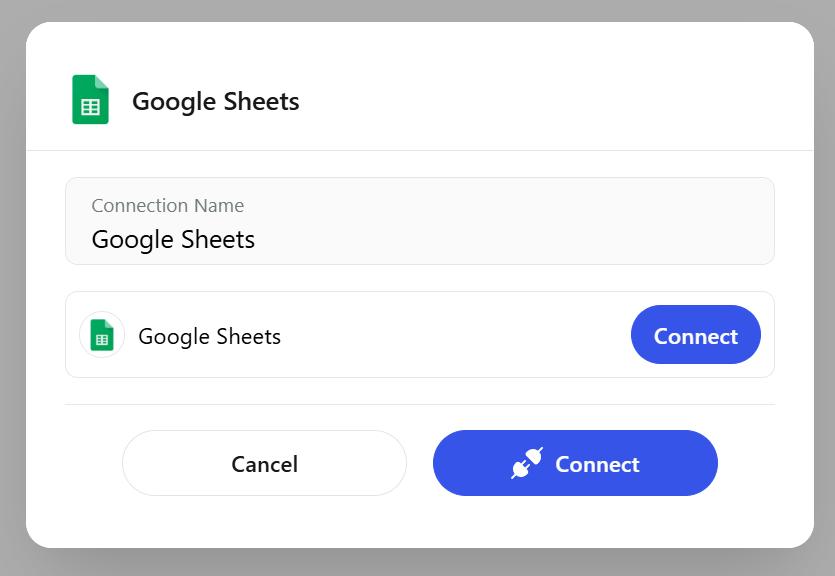
Enter a Connection Name, click Connect, and sign in with the Google account that can access your sheets. On the Google consent screen, click Allow to grant access to Drive files and Sheets spreadsheets.
Name the connection and click Connect
3
Confirm the connection
Google Sheets shows a check mark under Connected Apps.
The connection can only see sheets the Google account can open. Share the sheets you need with that account. For sheets in a shared drive, turn on Include Shared Drives (under Advanced) in the action.
Most actions come in two forms with the same name, for example two Find Rows or two Add Row entries. One picks the Spreadsheet and Worksheet from drop-downs; the other takes a Spreadsheet ID and Worksheet ID as text, which is handy when the IDs come from variables. Both do the same thing. This page describes the drop-down form.
Use New Row Added to add a contact to an agent each time a row is added, for example from a web form that writes to a sheet. New or Updated Row also fires when an existing row changes; set Trigger Column to fire only when one column changes. Instant triggers rely on Google’s change notifications, so delivery can lag by a few minutes. See Triggers.
Before the action, make sure the agent has the value to search for, either as a contact variable or as a value the AI extracts from the conversation (a Variables Extracted with Prompt field on the action).
2
Run Find Rows with a short fallback phrase
For example, “Let me check that for you.” The contact hears this while the lookup runs.
3
Tell the agent how to use the result
In the next step, add an instruction that says which row to pick and what to say, for example “Offer the cheapest plan with more data than the customer’s current plan.”
4
Handle no results
Add a scenario or branch for when nothing matches.
Add Add Row as a post-conversation action. Choose the Spreadsheet and Worksheet, turn on First Row Contains Headers to enter values by column name, then map each column under Values to a contact variable, a post-call analysis answer, or call data such as the outcome. Leave the outcome filter empty to log every call, or filter to log only some outcomes.To keep one row per contact instead of one per call, use Find or Create Row with the phone number as the Search Value: it returns the existing row or appends a new one.
The connected Google account can’t access it. Share the sheet with that account, or turn on Include Shared Drives if it’s in a shared drive.
Find Rows returns nothing
Check that the column header matches and that the search value has the same format as the cell (for example, a phone number with or without +). Turn off Exact Match to test partial matches.
Find Rows returns only one row
Number of Rows defaults to 1. Raise it to get more matches.
Rows are written to the wrong columns
The sheet’s headers changed after you set up the action. Reopen the action, reselect the worksheet, and remap the columns.
Lookups are slow during calls
Reduce the sheet size or search a smaller tab, and use a fallback phrase so the contact isn’t left in silence.
{"docsConfig":{"theme":"aspen","$schema":"https://mintlify.com/docs.json","name":"Callers","description":"Build AI agents that call, text, email, and talk to customers on your website. Guides, Web SDK, and API reference for the Callers platform.","colors":{"primary":"#3655E8","light":"#8EA0FF","dark":"#2A44C4"},"logo":{"light":"https://mintcdn.com/voxiaai/UdPum2goP7yfaYcC/logo/light.svg?fit=max\u0026auto=format\u0026n=UdPum2goP7yfaYcC\u0026q=85\u0026s=b1de758075c8bd929495ea22505d14b8","dark":"https://mintcdn.com/voxiaai/UdPum2goP7yfaYcC/logo/dark.svg?fit=max\u0026auto=format\u0026n=UdPum2goP7yfaYcC\u0026q=85\u0026s=cdb6dcbc265e95b7f15e77b15797cce6","href":"https://docs.callers.ai"},"favicon":"https://mintcdn.com/voxiaai/UdPum2goP7yfaYcC/logo/favicon.svg?fit=max\u0026auto=format\u0026n=UdPum2goP7yfaYcC\u0026q=85\u0026s=4a33273363fdf14d219145aa644b0ff7","appearance":{"default":"light","strict":false},"background":{"color":{"light":"#FFFFFF","dark":"#0A0D18"}},"navbar":{"links":[{"href":"https://www.callers.ai/book-a-meeting","label":"Book a demo"},{"href":"https://status.callers.ai","label":"Status"}],"primary":{"type":"button","label":"Open dashboard","href":"https://app.callers.ai"}},"footer":{"socials":{"linkedin":"https://www.linkedin.com/company/callersai","website":"https://www.callers.ai"},"links":[{"header":"Product","items":[{"label":"Website","href":"https://www.callers.ai"},{"label":"Dashboard","href":"https://app.callers.ai"},{"label":"Book a demo","href":"https://www.callers.ai/book-a-meeting"}]},{"header":"Developers","items":[{"label":"API Reference","href":"/api-reference/introduction"},{"label":"Web SDK","href":"/sdk/overview"},{"label":"SDK Playground","href":"https://sdk-playground.callers.dev"}]},{"header":"Company","items":[{"label":"Status","href":"https://status.callers.ai"},{"label":"Trust Center","href":"https://trust.callers.ai"},{"label":"Contact us","href":"mailto:contact@callers.ai"}]}]},"search":{"prompt":"Search docs or ask a question…"},"seo":{"metatags":{"og:site_name":"Callers Docs"},"indexing":"navigable"},"fonts":{"family":"Inter"},"icons":{"library":"fontawesome"},"styling":{"codeblocks":"dark","latex":false},"errors":{"404":{"redirect":false}},"contextual":{"options":["copy","view","chatgpt","claude","perplexity","mcp","cursor","vscode"],"display":"header"},"navigation":{"global":{"anchors":[{"anchor":"Dashboard","icon":"browser","href":"https://app.callers.ai"},{"anchor":"Status","icon":"signal","href":"https://status.callers.ai"}]},"pages":[]}},"deployment":{"deploymentMetadataValue":{"subdomain":"voxiaai","hasAudioNarration":false,"actualSubdomain":"voxiaai","customDomains":["docs.callers.ai"],"gitSource":{"type":"github","owner":"amy-io","repo":"docs","deployBranch":"master","contentDirectory":"","isPrivate":true,"mountPath":"","label":""},"chroma":{"liveDeploymentHistoryId":"6ae3763acedd4bb159cb2963","collectionId":"4c456f72-e1a9-48a0-a047-fb4eb4d2f1d3","schemaVersion":"v3","latestBuiltDeploymentHistoryId":"6ae3763acedd4bb159cb2963"},"entitlements":{},"buildId":"6ae3763acedd4bb159cb2963","clientVersion":"0.0.4044","searchFilterCounts":[{"language":"default","tag":"Guides","count":77},{"language":"default","tag":"API Reference","count":72},{"language":"default","tag":"Endpoints","count":59},{"language":"default","tag":"Integrations","count":19},{"language":"default","tag":"Web SDK","count":14},{"language":"default","tag":"Get started","count":11},{"language":"default","tag":"Build your agent","count":11},{"language":"default","tag":"Channels","count":11},{"language":"default","tag":"Agents","count":10},{"language":"default","tag":"Contacts","count":10}]},"assistantConfig":{},"basePath":"","hasChatPermissions":false,"hasWebMcpPermissions":false,"toggles":[{"name":"kill-isr","enabled":true,"variant":{"name":"disabled","enabled":false,"feature_enabled":true},"impressionData":false},{"name":"agent-mintlify-slack","enabled":true,"variant":{"name":"disabled","enabled":false,"feature_enabled":true},"impressionData":false},{"name":"agent-integrations-settings","enabled":true,"variant":{"name":"disabled","enabled":false,"feature_enabled":true},"impressionData":false},{"name":"automations-pr-grouping","enabled":true,"variant":{"name":"disabled","enabled":false,"feature_enabled":true},"impressionData":false},{"name":"custom-prefix","enabled":true,"variant":{"name":"disabled","enabled":false,"feature_enabled":true},"impressionData":false},{"name":"analytics-v7","enabled":true,"variant":{"name":"disabled","enabled":false,"feature_enabled":true},"impressionData":false},{"name":"user-flows-analytics","enabled":true,"variant":{"name":"disabled","enabled":false,"feature_enabled":true},"impressionData":false},{"name":"no-publish-flow","enabled":true,"variant":{"name":"disabled","enabled":false,"feature_enabled":true},"impressionData":false},{"name":"workos-onboarding","enabled":true,"variant":{"name":"disabled","enabled":false,"feature_enabled":true},"impressionData":false},{"name":"llms-txt-v2","enabled":true,"variant":{"name":"disabled","enabled":false,"feature_enabled":true},"impressionData":false},{"name":"snapshot-serving-live","enabled":true,"variant":{"name":"disabled","enabled":false,"feature_enabled":true},"impressionData":false},{"name":"stripTemperatureMiddleware","enabled":true,"variant":{"name":"disabled","enabled":false,"feature_enabled":true},"impressionData":false},{"name":"support-platform-pylon-zendesk","enabled":true,"variant":{"name":"disabled","enabled":false,"feature_enabled":true},"impressionData":false},{"name":"snapshot-serving","enabled":true,"variant":{"name":"disabled","enabled":false,"feature_enabled":true},"impressionData":false},{"name":"instant-rollback","enabled":true,"variant":{"name":"disabled","enabled":false,"feature_enabled":true},"impressionData":false},{"name":"granular-notifications-server","enabled":true,"variant":{"name":"disabled","enabled":false,"feature_enabled":true},"impressionData":false},{"name":"granular-notifications","enabled":true,"variant":{"name":"disabled","enabled":false,"feature_enabled":true},"impressionData":false},{"name":"automations-fable","enabled":true,"variant":{"name":"disabled","enabled":false,"feature_enabled":true},"impressionData":false},{"name":"fixed-ai-action-pricing","enabled":true,"variant":{"name":"disabled","enabled":false,"feature_enabled":true},"impressionData":false},{"name":"automation-resolve-merge-conflict","enabled":true,"variant":{"name":"disabled","enabled":false,"feature_enabled":true},"impressionData":false},{"name":"scoped-publishing","enabled":true,"variant":{"name":"disabled","enabled":false,"feature_enabled":true},"impressionData":false},{"name":"mintql","enabled":true,"variant":{"name":"disabled","enabled":false,"feature_enabled":true},"impressionData":false},{"name":"page-level-analytics","enabled":true,"variant":{"name":"disabled","enabled":false,"feature_enabled":true},"impressionData":false},{"name":"editor-version-history-v2","enabled":true,"variant":{"name":"disabled","enabled":false,"feature_enabled":true},"impressionData":false},{"name":"billing-page-v2","enabled":true,"variant":{"name":"disabled","enabled":false,"feature_enabled":true},"impressionData":false},{"name":"full-page-search","enabled":true,"variant":{"name":"disabled","enabled":false,"feature_enabled":true},"impressionData":false},{"name":"workspace-projects","enabled":true,"variant":{"name":"disabled","enabled":false,"feature_enabled":true},"impressionData":false},{"name":"assistant-v5","enabled":true,"variant":{"name":"disabled","enabled":false,"feature_enabled":true},"impressionData":false},{"name":"byok-sep-25","enabled":true,"variant":{"name":"disabled","enabled":false,"feature_enabled":true},"impressionData":false},{"name":"fork-pr-previews","enabled":true,"variant":{"name":"disabled","enabled":false,"feature_enabled":true},"impressionData":false},{"name":"revalidation-jwt","enabled":true,"variant":{"name":"disabled","enabled":false,"feature_enabled":true},"impressionData":false},{"name":"vite-origin","enabled":true,"variant":{"name":"disabled","enabled":false,"feature_enabled":true},"impressionData":false},{"name":"billing-updated-9-15","enabled":true,"variant":{"name":"disabled","enabled":false,"feature_enabled":true},"impressionData":false},{"name":"workos-sso-scim","enabled":true,"variant":{"name":"disabled","enabled":false,"feature_enabled":true},"impressionData":false},{"name":"hobby-abuse-scan","enabled":true,"variant":{"name":"disabled","enabled":false,"feature_enabled":true},"impressionData":false},{"name":"dashboard-inbox","enabled":true,"variant":{"name":"disabled","enabled":false,"feature_enabled":true},"impressionData":false},{"name":"workos-signup","enabled":true,"variant":{"name":"disabled","enabled":false,"feature_enabled":true},"impressionData":false},{"name":"turbopuffer-dual-write","enabled":true,"variant":{"name":"disabled","enabled":false,"feature_enabled":true},"impressionData":false},{"name":"workos-enabled","enabled":true,"variant":{"name":"disabled","enabled":false,"feature_enabled":true},"impressionData":false},{"name":"approve-review-flow","enabled":true,"variant":{"name":"disabled","enabled":false,"feature_enabled":true},"impressionData":false},{"name":"sso-setup-deadline-banner","enabled":true,"variant":{"name":"disabled","enabled":false,"feature_enabled":true},"impressionData":false}],"googleFontsInlined":false},"customCss":[{"filePath":"styles.css","href":"/_mintlify/custom/voxiaai/21a11cfc72d9362f/styles.css"}],"page":{"pagePath":"documentation/integrations/google-sheets","slug":"/documentation/integrations/google-sheets","pageMetadata":{"title":"Google Sheets","description":"Connect Google Sheets to look up data during calls, log results after calls, and add contacts to agents from new rows.","icon":"table","href":"/documentation/integrations/google-sheets"},"description":{"compiledSource":"\"use strict\";\nconst {jsx: _jsx} = arguments[0];\nconst {useMDXComponents: _provideComponents} = arguments[0];\nfunction _createMdxContent(props) {\n const _components = {\n p: \"p\",\n ..._provideComponents(),\n ...props.components\n };\n return _jsx(_components.p, {\n children: \"Connect Google Sheets to look up data during calls, log results after calls, and add contacts to agents from new rows.\"\n });\n}\nfunction MDXContent(props = {}) {\n const {wrapper: MDXLayout} = {\n ..._provideComponents(),\n ...props.components\n };\n return MDXLayout ? _jsx(MDXLayout, {\n ...props,\n children: _jsx(_createMdxContent, {\n ...props\n })\n }) : _createMdxContent(props);\n}\nreturn {\n default: MDXContent\n};\n","frontmatter":{},"scope":{}},"pageType":"default","mdx":{"mdxSource":{"compiledSource":"\"use strict\";const{Fragment:_Fragment,jsx:_jsx,jsxs:_jsxs}=arguments[0];const{useMDXComponents:_provideComponents}=arguments[0];function _createMdxContent(props){const _components={a:`a`,code:`code`,li:`li`,p:`p`,pre:`pre`,span:`span`,strong:`strong`,tbody:`tbody`,td:`td`,th:`th`,thead:`thead`,tr:`tr`,ul:`ul`,..._provideComponents(),...props.components},{Accordion,AccordionGroup,Card,CardGroup,CodeBlock,Frame,Heading,OptimizedImage,Step,Steps,Table,Tip}=_components;if(!Accordion)_missingMdxReference(`Accordion`,true);if(!AccordionGroup)_missingMdxReference(`AccordionGroup`,true);if(!Card)_missingMdxReference(`Card`,true);if(!CardGroup)_missingMdxReference(`CardGroup`,true);if(!CodeBlock)_missingMdxReference(`CodeBlock`,true);if(!Frame)_missingMdxReference(`Frame`,true);if(!Heading)_missingMdxReference(`Heading`,true);if(!OptimizedImage)_missingMdxReference(`OptimizedImage`,true);if(!Step)_missingMdxReference(`Step`,true);if(!Steps)_missingMdxReference(`Steps`,true);if(!Table)_missingMdxReference(`Table`,true);if(!Tip)_missingMdxReference(`Tip`,true);return _jsxs(_Fragment,{children:[_jsx(_components.p,{children:`The Google Sheets integration turns a spreadsheet into a live data source for your agents. Look up offers, prices, or customer records mid-call, write each call’s outcome to a log sheet, and add contacts to an agent whenever a row is added.`}),`\n`,_jsx(Heading,{level:`2`,id:`connect-google-sheets`,children:`Connect Google Sheets`}),`\n`,_jsxs(Steps,{children:[_jsx(Step,{title:`Find Google Sheets in the App Center`,children:_jsxs(_components.p,{children:[`Open `,_jsx(_components.strong,{children:`App Center`}),`, search for `,_jsx(_components.strong,{children:`Google Sheets`}),`, and click `,_jsx(_components.strong,{children:`+`}),`.`]})}),_jsxs(Step,{title:`Sign in with Google`,children:[_jsxs(_components.p,{children:[`Enter a `,_jsx(_components.strong,{children:`Connection Name`}),`, click `,_jsx(_components.strong,{children:`Connect`}),`, and sign in with the Google account that can access your sheets. On the Google consent screen, click `,_jsx(_components.strong,{children:`Allow`}),` to grant access to Drive files and Sheets spreadsheets.`]}),_jsx(Frame,{caption:`Name the connection and click Connect`,children:_jsx(OptimizedImage,{src:`https://mintcdn.com/voxiaai/PLwwPi9EfRJCP-aU/images/documentation/integrations/google-sheets-app-center.png?fit=max\u0026auto=format\u0026n=PLwwPi9EfRJCP-aU\u0026q=85\u0026s=8c0617354b8a1ccc2f5695d5caa22cc9`,alt:`Google Sheets connection window with a Connection Name field and Connect buttons`,\"data-og-width\":`835`,width:`835`,\"data-og-height\":`576`,height:`576`,\"data-path\":`images/documentation/integrations/google-sheets-app-center.png`,\"data-optimize\":`true`,\"data-opv\":`3`,srcset:`https://mintcdn.com/voxiaai/PLwwPi9EfRJCP-aU/images/documentation/integrations/google-sheets-app-center.png?w=280\u0026fit=max\u0026auto=format\u0026n=PLwwPi9EfRJCP-aU\u0026q=85\u0026s=e2441a097a6db0cf6397a022b1d007e8 280w, https://mintcdn.com/voxiaai/PLwwPi9EfRJCP-aU/images/documentation/integrations/google-sheets-app-center.png?w=560\u0026fit=max\u0026auto=format\u0026n=PLwwPi9EfRJCP-aU\u0026q=85\u0026s=7d83dece152f8069f293699665fa2efb 560w, https://mintcdn.com/voxiaai/PLwwPi9EfRJCP-aU/images/documentation/integrations/google-sheets-app-center.png?w=840\u0026fit=max\u0026auto=format\u0026n=PLwwPi9EfRJCP-aU\u0026q=85\u0026s=0ba0fa6a78332367972bce1577d5e9ba 840w, https://mintcdn.com/voxiaai/PLwwPi9EfRJCP-aU/images/documentation/integrations/google-sheets-app-center.png?w=1100\u0026fit=max\u0026auto=format\u0026n=PLwwPi9EfRJCP-aU\u0026q=85\u0026s=9f65998c8a4bbff3e2e3f4b80b79381a 1100w, https://mintcdn.com/voxiaai/PLwwPi9EfRJCP-aU/images/documentation/integrations/google-sheets-app-center.png?w=1650\u0026fit=max\u0026auto=format\u0026n=PLwwPi9EfRJCP-aU\u0026q=85\u0026s=576255e2bc0483282bb2d32f8d5197b8 1650w, https://mintcdn.com/voxiaai/PLwwPi9EfRJCP-aU/images/documentation/integrations/google-sheets-app-center.png?w=2500\u0026fit=max\u0026auto=format\u0026n=PLwwPi9EfRJCP-aU\u0026q=85\u0026s=5892ac1789431ba116f9ae4c7283befd 2500w`})})]}),_jsx(Step,{title:`Confirm the connection`,children:_jsxs(_components.p,{children:[`Google Sheets shows a check mark under `,_jsx(_components.strong,{children:`Connected Apps`}),`.`]})})]}),`\n`,_jsx(Tip,{children:_jsxs(_components.p,{children:[`The connection can only see sheets the Google account can open. Share the sheets you need with that account. For sheets in a shared drive, turn on `,_jsx(_components.strong,{children:`Include Shared Drives`}),` (under `,_jsx(_components.strong,{children:`Advanced`}),`) in the action.`]})}),`\n`,_jsx(Heading,{level:`2`,id:`available-actions`,children:`Available actions`}),`\n`,_jsxs(_components.p,{children:[`Most actions come in two forms with the same name, for example two `,_jsx(_components.strong,{children:`Find Rows`}),` or two `,_jsx(_components.strong,{children:`Add Row`}),` entries. One picks the `,_jsx(_components.strong,{children:`Spreadsheet`}),` and `,_jsx(_components.strong,{children:`Worksheet`}),` from drop-downs; the other takes a `,_jsx(_components.strong,{children:`Spreadsheet ID`}),` and `,_jsx(_components.strong,{children:`Worksheet ID`}),` as text, which is handy when the IDs come from variables. Both do the same thing. This page describes the drop-down form.`]}),`\n`,_jsx(Heading,{level:`3`,id:`rows`,children:`Rows`}),`\n`,_jsxs(Table,{children:[_jsx(_components.thead,{children:_jsxs(_components.tr,{children:[_jsx(_components.th,{children:`Action`}),_jsx(_components.th,{children:`What it does`})]})}),_jsxs(_components.tbody,{children:[_jsxs(_components.tr,{children:[_jsx(_components.td,{children:_jsx(_components.strong,{children:`Find Rows`})}),_jsx(_components.td,{children:`Finds rows where a column matches a value. This is the main lookup action.`})]}),_jsxs(_components.tr,{children:[_jsx(_components.td,{children:_jsx(_components.strong,{children:`Find or Create Row`})}),_jsx(_components.td,{children:`Looks up a row by column value and creates it if nothing matches`})]}),_jsxs(_components.tr,{children:[_jsx(_components.td,{children:_jsx(_components.strong,{children:`Get Row by Number`})}),_jsx(_components.td,{children:`Gets one row by its row number`})]}),_jsxs(_components.tr,{children:[_jsxs(_components.td,{children:[_jsx(_components.strong,{children:`Get Next Rows`}),` / `,_jsx(_components.strong,{children:`Get Next Rows (Paginated)`})]}),_jsx(_components.td,{children:`Reads rows in batches, continuing where the last run left off`})]}),_jsxs(_components.tr,{children:[_jsx(_components.td,{children:_jsx(_components.strong,{children:`Get All Rows`})}),_jsx(_components.td,{children:`Reads every row in a worksheet`})]}),_jsxs(_components.tr,{children:[_jsxs(_components.td,{children:[_jsx(_components.strong,{children:`Add Row`}),` / `,_jsx(_components.strong,{children:`Add Multiple Rows`})]}),_jsx(_components.td,{children:`Appends rows`})]}),_jsxs(_components.tr,{children:[_jsx(_components.td,{children:_jsx(_components.strong,{children:`Add Row at Top`})}),_jsx(_components.td,{children:`Inserts a row just below the header row`})]}),_jsxs(_components.tr,{children:[_jsxs(_components.td,{children:[_jsx(_components.strong,{children:`Update Row`}),` / `,_jsx(_components.strong,{children:`Update Multiple Rows`})]}),_jsx(_components.td,{children:`Overwrites rows by row number`})]}),_jsxs(_components.tr,{children:[_jsxs(_components.td,{children:[_jsx(_components.strong,{children:`Delete Row`}),` / `,_jsx(_components.strong,{children:`Delete Multiple Rows`})]}),_jsx(_components.td,{children:`Deletes a row, a range of rows, or a list of row numbers`})]}),_jsxs(_components.tr,{children:[_jsxs(_components.td,{children:[_jsx(_components.strong,{children:`Clear Row(s)`}),` / `,_jsx(_components.strong,{children:`Clear Cell Range`})]}),_jsx(_components.td,{children:`Clears cell contents without removing the rows`})]}),_jsxs(_components.tr,{children:[_jsxs(_components.td,{children:[_jsx(_components.strong,{children:`Format Row(s)`}),` / `,_jsx(_components.strong,{children:`Format Cells`})]}),_jsx(_components.td,{children:`Applies colour and text styling`})]})]})]}),`\n`,_jsx(Heading,{level:`3`,id:`cells-\u0026-ranges`,children:`Cells \u0026 ranges`}),`\n`,_jsxs(Table,{children:[_jsx(_components.thead,{children:_jsxs(_components.tr,{children:[_jsx(_components.th,{children:`Action`}),_jsx(_components.th,{children:`What it does`})]})}),_jsxs(_components.tbody,{children:[_jsxs(_components.tr,{children:[_jsxs(_components.td,{children:[_jsx(_components.strong,{children:`Read Data Range`}),` / `,_jsx(_components.strong,{children:`Read Cell Range`})]}),_jsxs(_components.td,{children:[`Reads cells by A1 notation, for example `,_jsx(_components.code,{children:`A1:D10`})]})]}),_jsxs(_components.tr,{children:[_jsx(_components.td,{children:_jsx(_components.strong,{children:`Write Cell Range`})}),_jsx(_components.td,{children:`Writes a 2D array of values at an A1 range`})]}),_jsxs(_components.tr,{children:[_jsx(_components.td,{children:_jsx(_components.strong,{children:`Append Values (Raw)`})}),_jsx(_components.td,{children:`Appends rows of values after the last row with data`})]}),_jsxs(_components.tr,{children:[_jsxs(_components.td,{children:[_jsx(_components.strong,{children:`Insert Rows/Columns`}),` / `,_jsx(_components.strong,{children:`Delete Rows/Columns`}),` / `,_jsx(_components.strong,{children:`Append Rows/Columns`})]}),_jsx(_components.td,{children:`Adds or removes blank rows or columns, shifting the rest`})]}),_jsxs(_components.tr,{children:[_jsxs(_components.td,{children:[_jsx(_components.strong,{children:`Create Column`}),` / `,_jsx(_components.strong,{children:`Add Column`})]}),_jsx(_components.td,{children:`Adds a column with a header name`})]}),_jsxs(_components.tr,{children:[_jsxs(_components.td,{children:[_jsx(_components.strong,{children:`Auto-Resize Columns/Rows`}),` / `,_jsx(_components.strong,{children:`Resize / Hide Rows or Columns`})]}),_jsx(_components.td,{children:`Sizes, hides, or unhides rows and columns`})]})]})]}),`\n`,_jsx(Heading,{level:`3`,id:`spreadsheets-\u0026-worksheets`,children:`Spreadsheets \u0026 worksheets`}),`\n`,_jsxs(Table,{children:[_jsx(_components.thead,{children:_jsxs(_components.tr,{children:[_jsx(_components.th,{children:`Action`}),_jsx(_components.th,{children:`What it does`})]})}),_jsxs(_components.tbody,{children:[_jsxs(_components.tr,{children:[_jsx(_components.td,{children:_jsx(_components.strong,{children:`Create Spreadsheet`})}),_jsx(_components.td,{children:`Creates a blank spreadsheet`})]}),_jsxs(_components.tr,{children:[_jsx(_components.td,{children:_jsx(_components.strong,{children:`Get Spreadsheet Info`})}),_jsx(_components.td,{children:`Returns a spreadsheet’s title and its worksheets`})]}),_jsxs(_components.tr,{children:[_jsxs(_components.td,{children:[_jsx(_components.strong,{children:`Find Spreadsheet(s)`}),` / `,_jsx(_components.strong,{children:`Find Spreadsheets`})]}),_jsx(_components.td,{children:`Finds spreadsheets by name`})]}),_jsxs(_components.tr,{children:[_jsxs(_components.td,{children:[_jsx(_components.strong,{children:`Create Worksheet`}),` / `,_jsx(_components.strong,{children:`Add Worksheet`}),` / `,_jsx(_components.strong,{children:`Find or Create Worksheet`})]}),_jsx(_components.td,{children:`Creates a tab, or finds one by title and creates it if missing`})]}),_jsxs(_components.tr,{children:[_jsxs(_components.td,{children:[_jsx(_components.strong,{children:`Find Worksheet(s)`}),` / `,_jsx(_components.strong,{children:`Find Worksheets`})]}),_jsx(_components.td,{children:`Finds tabs by title`})]}),_jsxs(_components.tr,{children:[_jsxs(_components.td,{children:[_jsx(_components.strong,{children:`Copy Worksheet`}),` / `,_jsx(_components.strong,{children:`Rename Worksheet`}),` / `,_jsx(_components.strong,{children:`Delete Worksheet`})]}),_jsx(_components.td,{children:`Manages tabs`})]}),_jsxs(_components.tr,{children:[_jsx(_components.td,{children:_jsx(_components.strong,{children:`Update Worksheet Properties`})}),_jsx(_components.td,{children:`Sets frozen rows and columns, tab colour, or hidden state`})]}),_jsxs(_components.tr,{children:[_jsx(_components.td,{children:_jsx(_components.strong,{children:`Clear Sheet`})}),_jsx(_components.td,{children:`Clears all rows, keeping the worksheet`})]}),_jsxs(_components.tr,{children:[_jsxs(_components.td,{children:[_jsx(_components.strong,{children:`Export Worksheet`}),` / `,_jsx(_components.strong,{children:`Export Worksheet (CSV/TSV)`})]}),_jsx(_components.td,{children:`Exports a tab as CSV or TSV`})]}),_jsxs(_components.tr,{children:[_jsx(_components.td,{children:_jsx(_components.strong,{children:`Custom API Call`})}),_jsx(_components.td,{children:`Calls any Google Sheets API endpoint with your connection`})]})]})]}),`\n`,_jsx(Heading,{level:`2`,id:`available-triggers`,children:`Available triggers`}),`\n`,_jsxs(Table,{children:[_jsx(_components.thead,{children:_jsxs(_components.tr,{children:[_jsx(_components.th,{children:`Trigger`}),_jsx(_components.th,{children:`Type`})]})}),_jsxs(_components.tbody,{children:[_jsxs(_components.tr,{children:[_jsx(_components.td,{children:_jsx(_components.strong,{children:`New Row Added`})}),_jsx(_components.td,{children:`Instant`})]}),_jsxs(_components.tr,{children:[_jsx(_components.td,{children:_jsx(_components.strong,{children:`New or Updated Row`})}),_jsx(_components.td,{children:`Instant`})]}),_jsxs(_components.tr,{children:[_jsx(_components.td,{children:_jsx(_components.strong,{children:`New Spreadsheet`})}),_jsx(_components.td,{children:`Scheduled`})]}),_jsxs(_components.tr,{children:[_jsx(_components.td,{children:_jsx(_components.strong,{children:`New Worksheet`})}),_jsx(_components.td,{children:`Scheduled`})]})]})]}),`\n`,_jsxs(_components.p,{children:[`Use `,_jsx(_components.strong,{children:`New Row Added`}),` to add a contact to an agent each time a row is added, for example from a web form that writes to a sheet. `,_jsx(_components.strong,{children:`New or Updated Row`}),` also fires when an existing row changes; set `,_jsx(_components.strong,{children:`Trigger Column`}),` to fire only when one column changes. Instant triggers rely on Google’s change notifications, so delivery can lag by a few minutes. See `,_jsx(_components.a,{href:`/documentation/integrations/triggers`,children:`Triggers`}),`.`]}),`\n`,_jsx(Heading,{level:`2`,id:`use-google-sheets-in-an-agent`,children:`Use Google Sheets in an agent`}),`\n`,_jsx(Heading,{level:`3`,id:`look-up-data-during-a-call-find-rows`,children:`Look up data during a call (Find Rows)`}),`\n`,_jsxs(_components.p,{children:[`Add `,_jsx(_components.strong,{children:`Find Rows`}),` as an in-call action to fetch data while the contact is on the line.`]}),`\n`,_jsxs(Table,{children:[_jsx(_components.thead,{children:_jsxs(_components.tr,{children:[_jsx(_components.th,{children:`Field`}),_jsx(_components.th,{children:`What to enter`})]})}),_jsxs(_components.tbody,{children:[_jsxs(_components.tr,{children:[_jsxs(_components.td,{children:[_jsx(_components.strong,{children:`Spreadsheet`}),` / `,_jsx(_components.strong,{children:`Worksheet`})]}),_jsx(_components.td,{children:`The sheet and tab to search`})]}),_jsxs(_components.tr,{children:[_jsx(_components.td,{children:_jsx(_components.strong,{children:`Column Name`})}),_jsx(_components.td,{children:`The column to search. The list shows the headers in the header row.`})]}),_jsxs(_components.tr,{children:[_jsx(_components.td,{children:_jsx(_components.strong,{children:`Search Value`})}),_jsxs(_components.td,{children:[`The value to match. Accepts `,_jsx(_components.a,{href:`/documentation/build-your-agent/agent-variables`,children:`variables`}),`, for example `,_jsx(_components.code,{children:`{{ account_id }}`}),`. Leave empty to return rows in order.`]})]}),_jsxs(_components.tr,{children:[_jsx(_components.td,{children:_jsx(_components.strong,{children:`Exact Match`})}),_jsx(_components.td,{children:`On: whole-value match. Off (default): partial match.`})]}),_jsxs(_components.tr,{children:[_jsx(_components.td,{children:_jsx(_components.strong,{children:`Number of Rows`})}),_jsxs(_components.td,{children:[`How many matching rows to return. Default `,_jsx(_components.code,{children:`1`}),`; raise it if you want several matches.`]})]}),_jsxs(_components.tr,{children:[_jsx(_components.td,{children:_jsx(_components.strong,{children:`Header Row`})}),_jsxs(_components.td,{children:[`The row with the column names. Default `,_jsx(_components.code,{children:`1`}),`.`]})]}),_jsxs(_components.tr,{children:[_jsx(_components.td,{children:_jsx(_components.strong,{children:`Starting Row`})}),_jsxs(_components.td,{children:[`Optional (under `,_jsx(_components.strong,{children:`Advanced`}),`). Start searching from this row number.`]})]}),_jsxs(_components.tr,{children:[_jsx(_components.td,{children:_jsx(_components.strong,{children:`Use Column Names`})}),_jsx(_components.td,{children:`On by default: keys each row by column name instead of A, B, C.`})]})]})]}),`\n`,_jsx(_components.p,{children:`The response uses your column headers as keys, and each match includes its row number:`}),`\n`,_jsx(CodeBlock,{filename:``,numberOfLines:`11`,language:`text`,children:_jsx(_components.pre,{className:`shiki shiki-themes dark-plus dark-plus`,style:{backgroundColor:`#0B0C0E`,\"--shiki-dark-bg\":`#0B0C0E`,color:`#D4D4D4`,\"--shiki-dark\":`#D4D4D4`},language:`text`,children:_jsxs(_components.code,{language:`text`,numberOfLines:`11`,children:[_jsx(_components.span,{className:`line`,children:_jsx(_components.span,{children:`0`})}),`\n`,_jsx(_components.span,{className:`line`,children:_jsx(_components.span,{children:` row: 51`})}),`\n`,_jsx(_components.span,{className:`line`,children:_jsx(_components.span,{children:` values:`})}),`\n`,_jsx(_components.span,{className:`line`,children:_jsx(_components.span,{children:` package_code: 12140451`})}),`\n`,_jsx(_components.span,{className:`line`,children:_jsx(_components.span,{children:` price: 320`})}),`\n`,_jsx(_components.span,{className:`line`,children:_jsx(_components.span,{children:` data_cap_gb: 80`})}),`\n`,_jsx(_components.span,{className:`line`,children:_jsx(_components.span,{children:`1`})}),`\n`,_jsx(_components.span,{className:`line`,children:_jsx(_components.span,{children:` row: 52`})}),`\n`,_jsx(_components.span,{className:`line`,children:_jsx(_components.span,{children:` values:`})}),`\n`,_jsx(_components.span,{className:`line`,children:_jsx(_components.span,{children:` ...`})}),`\n`,_jsx(_components.span,{className:`line`,children:_jsx(_components.span,{})})]})})}),`\n`,_jsx(_components.p,{children:`A reliable pattern for live lookups:`}),`\n`,_jsxs(Steps,{children:[_jsx(Step,{title:`Capture the search value`,children:_jsxs(_components.p,{children:[`Before the action, make sure the agent has the value to search for, either as a contact variable or as a value the AI extracts from the conversation (a `,_jsx(_components.strong,{children:`Variables Extracted with Prompt`}),` field on the action).`]})}),_jsx(Step,{title:`Run Find Rows with a short fallback phrase`,children:_jsx(_components.p,{children:`For example, “Let me check that for you.” The contact hears this while the lookup runs.`})}),_jsx(Step,{title:`Tell the agent how to use the result`,children:_jsx(_components.p,{children:`In the next step, add an instruction that says which row to pick and what to say, for example “Offer the cheapest plan with more data than the customer’s current plan.”`})}),_jsx(Step,{title:`Handle no results`,children:_jsx(_components.p,{children:`Add a scenario or branch for when nothing matches.`})})]}),`\n`,_jsx(Heading,{level:`3`,id:`log-every-call-add-row`,children:`Log every call (Add Row)`}),`\n`,_jsxs(_components.p,{children:[`Add `,_jsx(_components.strong,{children:`Add Row`}),` as a post-conversation action. Choose the `,_jsx(_components.strong,{children:`Spreadsheet`}),` and `,_jsx(_components.strong,{children:`Worksheet`}),`, turn on `,_jsx(_components.strong,{children:`First Row Contains Headers`}),` to enter values by column name, then map each column under `,_jsx(_components.strong,{children:`Values`}),` to a contact variable, a `,_jsx(_components.a,{href:`/documentation/using-callers/key-questions`,children:`post-call analysis`}),` answer, or call data such as the outcome. Leave the outcome filter empty to log every call, or filter to log only some outcomes.`]}),`\n`,_jsxs(_components.p,{children:[`To keep one row per contact instead of one per call, use `,_jsx(_components.strong,{children:`Find or Create Row`}),` with the phone number as the `,_jsx(_components.strong,{children:`Search Value`}),`: it returns the existing row or appends a new one.`]}),`\n`,_jsx(Heading,{level:`2`,id:`best-practices-for-lookup-sheets`,children:`Best practices for lookup sheets`}),`\n`,_jsxs(_components.ul,{children:[`\n`,_jsxs(_components.li,{children:[_jsx(_components.strong,{children:`One row per item, headers in row 1.`}),` The headers become the response keys.`]}),`\n`,_jsxs(_components.li,{children:[_jsx(_components.strong,{children:`Short, consistent header names`}),` in `,_jsx(_components.code,{children:`snake_case`}),`, for example `,_jsx(_components.code,{children:`data_cap_gb`}),`, `,_jsx(_components.code,{children:`price`}),`.`]}),`\n`,_jsxs(_components.li,{children:[_jsx(_components.strong,{children:`Clean values.`}),` Store numbers as numbers (no units in the cell) and dates in ISO format (`,_jsx(_components.code,{children:`2026-10-26`}),`).`]}),`\n`,_jsxs(_components.li,{children:[_jsx(_components.strong,{children:`A dedicated lookup tab`}),` with only the columns the agent needs.`]}),`\n`,_jsxs(_components.li,{children:[_jsx(_components.strong,{children:`Keep it small.`}),` Large sheets make in-call lookups slower. Filter to the rows that matter.`]}),`\n`]}),`\n`,_jsx(Heading,{level:`2`,id:`troubleshooting`,children:`Troubleshooting`}),`\n`,_jsxs(AccordionGroup,{children:[_jsx(Accordion,{title:`My spreadsheet isn't in the list`,id:`my-spreadsheet-isnt-in-the-list`,children:_jsxs(_components.p,{children:[`The connected Google account can’t access it. Share the sheet with that account, or turn on `,_jsx(_components.strong,{children:`Include Shared Drives`}),` if it’s in a shared drive.`]})}),_jsx(Accordion,{title:`Find Rows returns nothing`,id:`find-rows-returns-nothing`,children:_jsxs(_components.p,{children:[`Check that the column header matches and that the search value has the same format as the cell (for example, a phone number with or without `,_jsx(_components.code,{children:`+`}),`). Turn off `,_jsx(_components.strong,{children:`Exact Match`}),` to test partial matches.`]})}),_jsx(Accordion,{title:`Find Rows returns only one row`,id:`find-rows-returns-only-one-row`,children:_jsxs(_components.p,{children:[_jsx(_components.strong,{children:`Number of Rows`}),` defaults to `,_jsx(_components.code,{children:`1`}),`. Raise it to get more matches.`]})}),_jsx(Accordion,{title:`Rows are written to the wrong columns`,id:`rows-are-written-to-the-wrong-columns`,children:_jsx(_components.p,{children:`The sheet’s headers changed after you set up the action. Reopen the action, reselect the worksheet, and remap the columns.`})}),_jsx(Accordion,{title:`Lookups are slow during calls`,id:`lookups-are-slow-during-calls`,children:_jsx(_components.p,{children:`Reduce the sheet size or search a smaller tab, and use a fallback phrase so the contact isn’t left in silence.`})})]}),`\n`,_jsx(Heading,{level:`2`,id:`related`,children:`Related`}),`\n`,_jsxs(CardGroup,{cols:2,children:[_jsx(Card,{title:`Actions overview`,icon:`diagram-project`,href:`/documentation/integrations/summary-actions`,children:_jsx(_components.p,{children:`Where each action runs and what data it can use.`})}),_jsx(Card,{title:`Actions`,icon:`code`,href:`/documentation/build-your-agent/agent-actions`,children:_jsx(_components.p,{children:`Configure in-call action settings.`})}),_jsx(Card,{title:`Triggers`,icon:`bolt`,href:`/documentation/integrations/triggers`,children:_jsx(_components.p,{children:`Add contacts from new rows.`})}),_jsx(Card,{title:`App Center`,icon:`grid-2`,href:`/documentation/integrations/app-center`,children:_jsx(_components.p,{children:`Manage connections.`})})]})]})}function MDXContent(props={}){const{wrapper:MDXLayout}={..._provideComponents(),...props.components};return MDXLayout?_jsx(MDXLayout,{...props,children:_jsx(_createMdxContent,{...props})}):_createMdxContent(props)}return{default:MDXContent};function _missingMdxReference(id,component){throw new Error(`Expected `+(component?`component`:`object`)+\" `\"+id+\"` to be defined: you likely forgot to import, pass, or provide it.\")}","frontmatter":{},"scope":{"codeStyling":"dark","config":{},"pageMetadata":{"title":"Google Sheets","description":"Connect Google Sheets to look up data during calls, log results after calls, and add contacts to agents from new rows.","icon":"table","href":"/documentation/integrations/google-sheets"}}},"mdxSourceWithNoJs":null},"mdxExtracts":{"tableOfContents":[{"title":"Connect Google Sheets","slug":"connect-google-sheets","depth":2,"children":[]},{"title":"Available actions","slug":"available-actions","depth":2,"children":[{"title":"Rows","slug":"rows","depth":3,"children":[]},{"title":"Cells \u0026 ranges","slug":"cells-\u0026-ranges","depth":3,"children":[]},{"title":"Spreadsheets \u0026 worksheets","slug":"spreadsheets-\u0026-worksheets","depth":3,"children":[]}]},{"title":"Available triggers","slug":"available-triggers","depth":2,"children":[]},{"title":"Use Google Sheets in an agent","slug":"use-google-sheets-in-an-agent","depth":2,"children":[{"title":"Look up data during a call (Find Rows)","slug":"look-up-data-during-a-call-find-rows","depth":3,"children":[]},{"title":"Log every call (Add Row)","slug":"log-every-call-add-row","depth":3,"children":[]}]},{"title":"Best practices for lookup sheets","slug":"best-practices-for-lookup-sheets","depth":2,"children":[]},{"title":"Troubleshooting","slug":"troubleshooting","depth":2,"children":[]},{"title":"Related","slug":"related","depth":2,"children":[]}],"codeExamples":{}},"jsLinks":[],"subdomain":"voxiaai","siteName":"Callers","title":"Google Sheets - Callers","navMaps":{"firstHrefInVersion":{},"firstHrefInLanguage":{}},"lastModified":"2026-10-26T17:06:38.417Z","originalFileLocation":"documentation/integrations/google-sheets.mdx"},"headHtml":"\u003cscript data-mint-head>(function(){var d=document.documentElement,p=null;if(!p){try{p=localStorage.getItem(\"isDarkMode\")}catch(e){}if(p==='true')p='dark';else if(p==='false')p='light';if(p!=='light'\u0026\u0026p!=='dark'\u0026\u0026p!=='system')p=\"light\"}var r=p==='system'?(matchMedia(\"(prefers-color-scheme: dark)\").matches?'dark':'light'):p;d.classList.remove(r==='dark'?'light':'dark');d.classList.add(r);d.setAttribute(\"data-theme-preference\",p)})();\u003c/script>\u003cmeta data-mint-head name=\"description\" content=\"Connect Google Sheets to look up data during calls, log results after calls, and add contacts to agents from new rows.\">\u003cmeta data-mint-head name=\"application-name\" content=\"Callers\">\u003cmeta data-mint-head name=\"generator\" content=\"Mintlify\">\u003clink data-mint-head rel=\"icon\" type=\"image/png\" sizes=\"192x192\" href=\"/mintlify-assets/_mintlify/favicons/voxiaai/QQLjIdxYdrMgCmrs/_generated/favicon/android-chrome-192x192.png\" media=\"(prefers-color-scheme: light)\">\u003clink data-mint-head rel=\"apple-touch-icon\" type=\"image/png\" sizes=\"180x180\" href=\"/mintlify-assets/_mintlify/favicons/voxiaai/QQLjIdxYdrMgCmrs/_generated/favicon/apple-touch-icon.png\">\u003clink data-mint-head rel=\"icon\" type=\"image/png\" sizes=\"16x16\" href=\"/mintlify-assets/_mintlify/favicons/voxiaai/QQLjIdxYdrMgCmrs/_generated/favicon/favicon-16x16.png\" media=\"(prefers-color-scheme: light)\">\u003clink data-mint-head rel=\"icon\" type=\"image/png\" sizes=\"32x32\" href=\"/mintlify-assets/_mintlify/favicons/voxiaai/QQLjIdxYdrMgCmrs/_generated/favicon/favicon-32x32.png\" media=\"(prefers-color-scheme: light)\">\u003clink data-mint-head rel=\"shortcut icon\" type=\"image/x-icon\" href=\"/mintlify-assets/_mintlify/favicons/voxiaai/QQLjIdxYdrMgCmrs/_generated/favicon/favicon.ico\" media=\"(prefers-color-scheme: light)\">\u003clink data-mint-head rel=\"icon\" type=\"image/png\" sizes=\"192x192\" href=\"/mintlify-assets/_mintlify/favicons/voxiaai/QQLjIdxYdrMgCmrs/_generated/favicon-dark/android-chrome-192x192.png\" media=\"(prefers-color-scheme: dark)\">\u003clink data-mint-head rel=\"icon\" type=\"image/png\" sizes=\"16x16\" href=\"/mintlify-assets/_mintlify/favicons/voxiaai/QQLjIdxYdrMgCmrs/_generated/favicon-dark/favicon-16x16.png\" media=\"(prefers-color-scheme: dark)\">\u003clink data-mint-head rel=\"icon\" type=\"image/png\" sizes=\"32x32\" href=\"/mintlify-assets/_mintlify/favicons/voxiaai/QQLjIdxYdrMgCmrs/_generated/favicon-dark/favicon-32x32.png\" media=\"(prefers-color-scheme: dark)\">\u003clink data-mint-head rel=\"shortcut icon\" type=\"image/x-icon\" href=\"/mintlify-assets/_mintlify/favicons/voxiaai/QQLjIdxYdrMgCmrs/_generated/favicon-dark/favicon.ico\" media=\"(prefers-color-scheme: dark)\">\u003cmeta data-mint-head property=\"og:title\" content=\"Google Sheets - Callers\">\u003cmeta data-mint-head property=\"og:description\" content=\"Connect Google Sheets to look up data during calls, log results after calls, and add contacts to agents from new rows.\">\u003cmeta data-mint-head property=\"og:site_name\" content=\"Callers Docs\">\u003cmeta data-mint-head property=\"og:url\" content=\"https://docs.callers.ai/documentation/integrations/google-sheets\">\u003cmeta data-mint-head property=\"og:type\" content=\"website\">\u003cmeta data-mint-head property=\"og:image\" content=\"https://voxiaai.mintlify.app/_mintlify/api/og/v2?division=Apps\u0026amp;title=Google+Sheets\u0026amp;description=Connect+Google+Sheets+to+look+up+data+during+calls%2C+log+results+after+calls%2C+and+add+contacts+to+agents+from+new+rows.\u0026amp;theme=e7b044c42271a380df08b2cb\u0026amp;signature=193b69c4464871994689a1ea965819e60ce3b5084366ff7a5ce7e13c192f9736\">\u003cmeta data-mint-head property=\"og:image:width\" content=\"1200\">\u003cmeta data-mint-head property=\"og:image:height\" content=\"630\">\u003cmeta data-mint-head name=\"twitter:card\" content=\"summary_large_image\">\u003cmeta data-mint-head name=\"twitter:title\" content=\"Google Sheets - Callers\">\u003cmeta data-mint-head name=\"twitter:description\" content=\"Connect Google Sheets to look up data during calls, log results after calls, and add contacts to agents from new rows.\">\u003cmeta data-mint-head name=\"twitter:image\" content=\"https://voxiaai.mintlify.app/_mintlify/api/og/v2?division=Apps\u0026amp;title=Google+Sheets\u0026amp;description=Connect+Google+Sheets+to+look+up+data+during+calls%2C+log+results+after+calls%2C+and+add+contacts+to+agents+from+new+rows.\u0026amp;theme=e7b044c42271a380df08b2cb\u0026amp;signature=193b69c4464871994689a1ea965819e60ce3b5084366ff7a5ce7e13c192f9736\">\u003cmeta data-mint-head name=\"twitter:image:width\" content=\"1200\">\u003cmeta data-mint-head name=\"twitter:image:height\" content=\"630\">\u003cmeta data-mint-head name=\"msapplication-config\" content=\"/mintlify-assets/_mintlify/favicons/voxiaai/QQLjIdxYdrMgCmrs/_generated/favicon/browserconfig.xml\">\u003cmeta data-mint-head name=\"apple-mobile-web-app-title\" content=\"Callers\">\u003cmeta data-mint-head name=\"msapplication-TileColor\" content=\"#3655E8\">\u003clink data-mint-head rel=\"canonical\" href=\"https://docs.callers.ai/documentation/integrations/google-sheets\">\u003clink data-mint-head rel=\"alternate\" type=\"application/xml\" href=\"/sitemap.xml\">\u003clink data-mint-head rel=\"alternate\" type=\"text/markdown\" href=\"/documentation/integrations/google-sheets.md\">\u003cscript data-mint-head type=\"application/ld+json\">{\"@context\":\"https://schema.org\",\"@graph\":[{\"@type\":\"Organization\",\"@id\":\"https://docs.callers.ai/#organization\",\"name\":\"Callers\",\"url\":\"https://docs.callers.ai\",\"logo\":{\"@type\":\"ImageObject\",\"url\":\"https://mintcdn.com/voxiaai/UdPum2goP7yfaYcC/logo/light.svg?fit=max\u0026auto=format\u0026n=UdPum2goP7yfaYcC\u0026q=85\u0026s=b1de758075c8bd929495ea22505d14b8\"}},{\"@type\":\"WebSite\",\"@id\":\"https://docs.callers.ai#website\",\"name\":\"Callers\",\"url\":\"https://docs.callers.ai\",\"publisher\":{\"@id\":\"https://docs.callers.ai/#organization\"}},{\"@type\":\"WebPage\",\"@id\":\"https://docs.callers.ai/documentation/integrations/google-sheets#webpage\",\"url\":\"https://docs.callers.ai/documentation/integrations/google-sheets\",\"name\":\"Google Sheets\",\"description\":\"Connect Google Sheets to look up data during calls, log results after calls, and add contacts to agents from new rows.\",\"dateModified\":\"2026-10-26T17:06:38.417Z\",\"isPartOf\":{\"@id\":\"https://docs.callers.ai#website\"},\"breadcrumb\":{\"@id\":\"https://docs.callers.ai/documentation/integrations/google-sheets#breadcrumb\"}},{\"@type\":\"BreadcrumbList\",\"@id\":\"https://docs.callers.ai/documentation/integrations/google-sheets#breadcrumb\",\"itemListElement\":[{\"@type\":\"ListItem\",\"position\":1,\"name\":\"Apps\",\"item\":\"https://docs.callers.ai/documentation/integrations/salesforce\"},{\"@type\":\"ListItem\",\"position\":2,\"name\":\"Google Sheets\",\"item\":\"https://docs.callers.ai/documentation/integrations/google-sheets\"}]},{\"@type\":[\"Article\",\"TechArticle\"],\"@id\":\"https://docs.callers.ai/documentation/integrations/google-sheets#article\",\"headline\":\"Google Sheets\",\"name\":\"Google Sheets\",\"description\":\"Connect Google Sheets to look up data during calls, log results after calls, and add contacts to agents from new rows.\",\"url\":\"https://docs.callers.ai/documentation/integrations/google-sheets\",\"mainEntityOfPage\":{\"@id\":\"https://docs.callers.ai/documentation/integrations/google-sheets#webpage\"},\"dateModified\":\"2026-10-26T17:06:38.417Z\",\"publisher\":{\"@id\":\"https://docs.callers.ai/#organization\"},\"isPartOf\":{\"@id\":\"https://docs.callers.ai#website\"}}]}\u003c/script>\u003cscript data-mint-head type=\"application/ld+json\">{\"@context\":\"https://schema.org\",\"@type\":\"WebSite\",\"name\":\"Callers\",\"creator\":{\"@type\":\"Organization\",\"name\":\"Mintlify\",\"url\":\"https://mintlify.com\"}}\u003c/script>","siteName":"Callers","nav":{"global":{"anchors":[{"anchor":"Dashboard","icon":"browser","href":"https://app.callers.ai"},{"anchor":"Status","icon":"signal","href":"https://status.callers.ai"}]},"tabs":[{"tab":"Guides","icon":"book-open","pages":[{"title":"Guides","href":"/documentation/get-started/getting-started-with-callers"}]},{"tab":"Integrations","icon":"grid-2","groups":[{"group":"Catalog","pages":[{"title":"Integrations catalog","sidebarTitle":"Catalog","icon":"grid-2","mode":"wide","href":"/documentation/integrations/catalog"}]},{"group":"App Center","pages":[{"title":"App Center","icon":"grid-2","href":"/documentation/integrations/app-center"},{"title":"Actions Overview","sidebarTitle":"Actions overview","icon":"diagram-project","href":"/documentation/integrations/summary-actions"},{"title":"Triggers","icon":"bolt","href":"/documentation/integrations/triggers"},{"title":"A2A connections","sidebarTitle":"A2A connections","icon":"circle-nodes","href":"/documentation/integrations/a2a-connections"},{"title":"Zapier","icon":"bolt","href":"/documentation/integrations/zapier"}]},{"group":"Telephony","pages":[{"title":"Telephony Overview","sidebarTitle":"Overview","icon":"tower-cell","href":"/documentation/integrations/telephony"},{"group":"SIP trunking","icon":"network-wired","pages":[{"title":"SIP Trunk Setup","sidebarTitle":"SIP trunk","icon":"network-wired","href":"/documentation/integrations/sip"},{"title":"Telnyx","sidebarTitle":"Telnyx","icon":"tower-broadcast","href":"/documentation/integrations/telnyx-integration"},{"title":"CommPeak","sidebarTitle":"CommPeak","icon":"phone-volume","href":"/documentation/integrations/commpeak-integration"},{"title":"Plivo","sidebarTitle":"Plivo","icon":"phone-volume","href":"/documentation/integrations/plivo-integration"},{"title":"Squaretalk","sidebarTitle":"Squaretalk","icon":"phone-volume","href":"/documentation/integrations/squaretalk-integration"},{"title":"Twilio SIP","sidebarTitle":"Twilio SIP","icon":"phone-arrow-up-right","href":"/documentation/integrations/twilio-sip"}]},{"title":"Twilio","icon":"phone","href":"/documentation/integrations/twilio"}]},{"group":"Apps","pages":[{"title":"Salesforce","icon":"salesforce","href":"/documentation/integrations/salesforce"},{"title":"HubSpot","description":"Connect HubSpot to sync contacts, deals, and tickets with your agents, and to start calling new HubSpot contacts automatically.","icon":"hubspot","href":"/documentation/integrations/hubspot"},{"title":"Google Sheets","icon":"table","href":"/documentation/integrations/google-sheets"},{"title":"Slack","description":"Post call results and alerts to Slack channels from your agents, using the Slack app, a Slack incoming webhook, or Zapier.","icon":"slack","href":"/documentation/integrations/slack"},{"title":"Cal.com","icon":"calendar","href":"/documentation/integrations/cal-com"}]}]},{"tab":"Web SDK","icon":"code","pages":[{"title":"Web SDK","href":"/sdk/overview"}]},{"tab":"API Reference","icon":"brackets-curly","pages":[{"title":"API Reference","href":"/api-reference/introduction"}]},{"tab":"Changelog","icon":"sparkles","pages":[{"title":"Changelog","href":"/documentation/resources/changelog"}]}]},"basePath":"","title":"Google Sheets - Callers","buildId":"dpl_DeHjVRGfFnhYQwHnfC2pjeXXv8h9","deploymentId":"dpl_DeHjVRGfFnhYQwHnfC2pjeXXv8h9","dynamics":["07c022d89b","a74be98ba7"],"chunks":["Frame-DXXFP6nH.js","DynamicMarkdown-B54_zNBF.js","zoom-image-lightbox-BG6oD64b.js","lightbox-handle-r17bVUz3.js"]}