> ## Documentation Index
> Fetch the complete documentation index at: https://docs.callers.ai/llms.txt
> Use this file to discover all available pages before exploring further.
# Installing the Widget
> Add the Callers widget to your website so visitors can talk to your AI agent - by voice or text - directly in the browser, without dialing a phone number.
## What Is the Widget?
The widget is a small piece of Callers that lives on your website. Visitors see a floating button in the corner of the page; when they click it, they can start a conversation with your AI agent right there in the browser - **by voice or by text**, with no phone number and no app to install.
Because the conversation runs on your own website, you already know who the visitor is. You can pass their name, email, or plan into the campaign so the agent greets them by name and skips the questions you already have answers to.
Conversations run over the browser, so there are no per-minute telephony costs and no number to provision.
Visitors choose how they want to talk. The same campaign script handles both.
Pass what you already know about the visitor into the campaign as variables.
A one-line script tag for most sites, or the Web SDK when you need full control.
Widget campaigns are enabled per account. If you don't see the **Widget** option described below, contact [support@callers.ai](mailto:support@callers.ai) to have it turned on.
***
## Step 1: Create a Widget Campaign
From your dashboard, click **New Campaign**.
In the campaign editor, open the **General Settings** modal.
In the channel row - **Voice**, **Text**, **Email**, **Widget** - choose **Widget**.
Give the campaign a descriptive name so you can find it later, then close the modal.
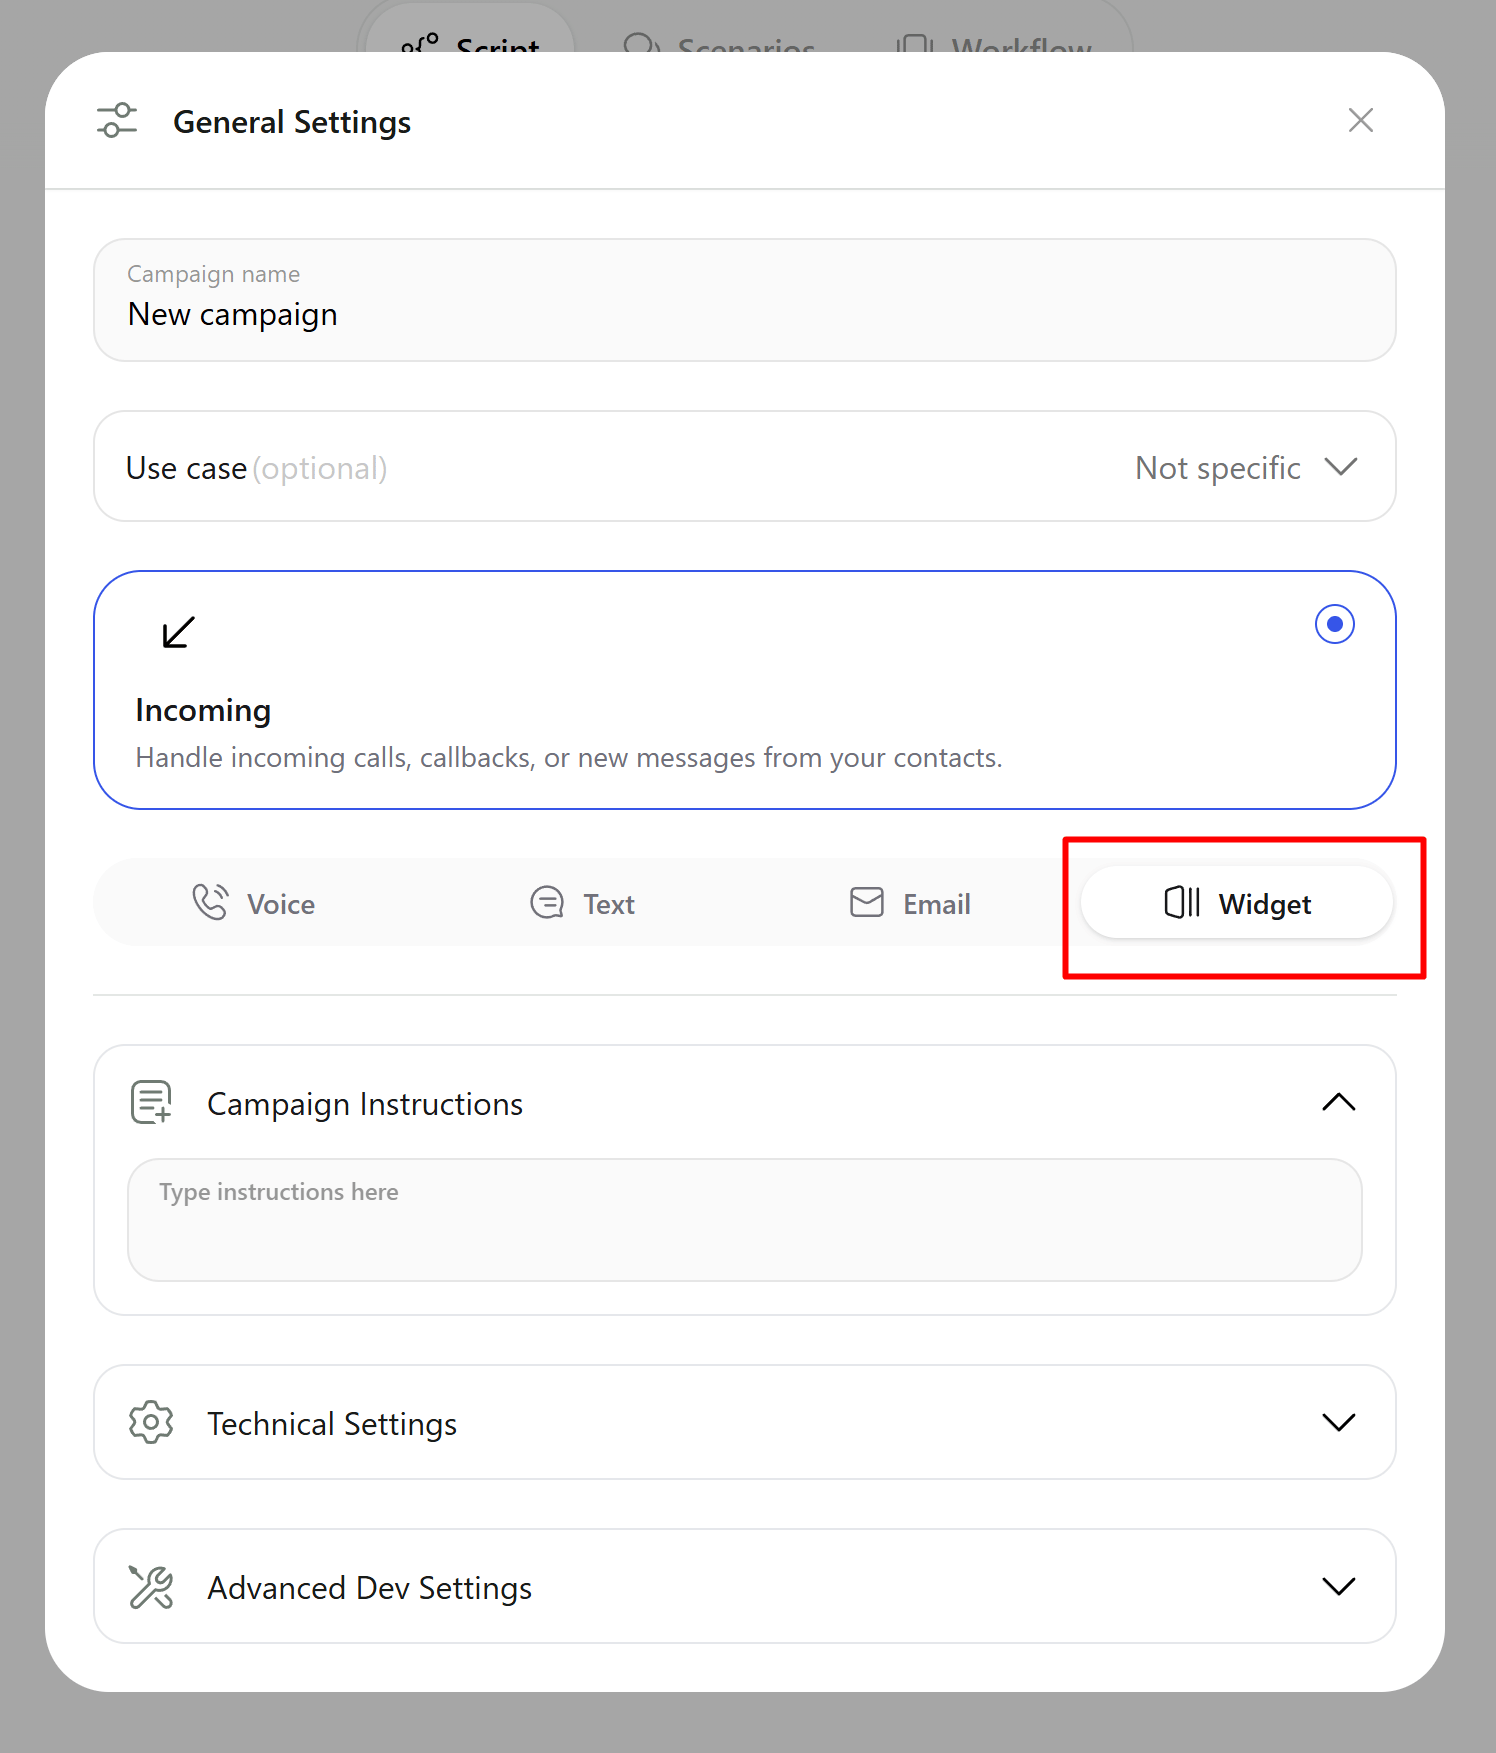 ### What Changes When You Pick Widget
Selecting **Widget** reconfigures the campaign automatically:
* The campaign becomes **Incoming**. Your visitors start the conversation - the widget never dials out.
* **Outgoing phone numbers are cleared**, and incoming phone calls are switched off. A widget campaign is reached through your website only.
* A **web call secret** is generated for the campaign. You'll need it only if you build a custom integration ([see below](#custom-integration-web-sdk)).
Switching an existing campaign to **Widget** removes its phone numbers. If you want to keep a phone campaign running, create a separate campaign for the widget instead of converting the one you already have.
### Build Your Script
A widget campaign uses the same script builder as a voice campaign. Write your steps, add actions, and set up variables exactly as you normally would - see [Campaign Script](/documentation/build-your-campaign/campaign-script) and [Campaign Variables](/documentation/build-your-campaign/campaign-variables).
Any variables you define here become available to the widget, so you can pass real values from your website into the conversation.
Save your campaign before continuing. The installation code is generated from the saved campaign, so the installer stays empty until the campaign exists.
***
## Step 2: Open the Installer
In the campaign toolbar, click the **plug** icon to open the **Install the widget** window.
### What Changes When You Pick Widget
Selecting **Widget** reconfigures the campaign automatically:
* The campaign becomes **Incoming**. Your visitors start the conversation - the widget never dials out.
* **Outgoing phone numbers are cleared**, and incoming phone calls are switched off. A widget campaign is reached through your website only.
* A **web call secret** is generated for the campaign. You'll need it only if you build a custom integration ([see below](#custom-integration-web-sdk)).
Switching an existing campaign to **Widget** removes its phone numbers. If you want to keep a phone campaign running, create a separate campaign for the widget instead of converting the one you already have.
### Build Your Script
A widget campaign uses the same script builder as a voice campaign. Write your steps, add actions, and set up variables exactly as you normally would - see [Campaign Script](/documentation/build-your-campaign/campaign-script) and [Campaign Variables](/documentation/build-your-campaign/campaign-variables).
Any variables you define here become available to the widget, so you can pass real values from your website into the conversation.
Save your campaign before continuing. The installation code is generated from the saved campaign, so the installer stays empty until the campaign exists.
***
## Step 2: Open the Installer
In the campaign toolbar, click the **plug** icon to open the **Install the widget** window.
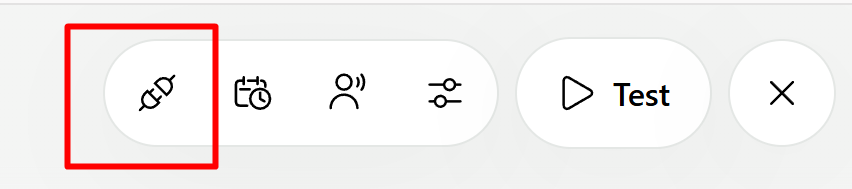 This icon appears only on widget campaigns - it takes the place of the **Channels** button used by phone and messaging campaigns.
The window has two tabs:
| Tab | Use it when |
| ---------------- | ------------------------------------------------------------------------------------------ |
| **Embed on Web** | You want the standard widget on your site. One script tag, no development work. |
| **Custom** | You need your own UI, your own launch button, or authenticated visitors. Uses the Web SDK. |
Most sites should use **Embed on Web**.
***
## Embed on Web
This icon appears only on widget campaigns - it takes the place of the **Channels** button used by phone and messaging campaigns.
The window has two tabs:
| Tab | Use it when |
| ---------------- | ------------------------------------------------------------------------------------------ |
| **Embed on Web** | You want the standard widget on your site. One script tag, no development work. |
| **Custom** | You need your own UI, your own launch button, or authenticated visitors. Uses the Web SDK. |
Most sites should use **Embed on Web**.
***
## Embed on Web
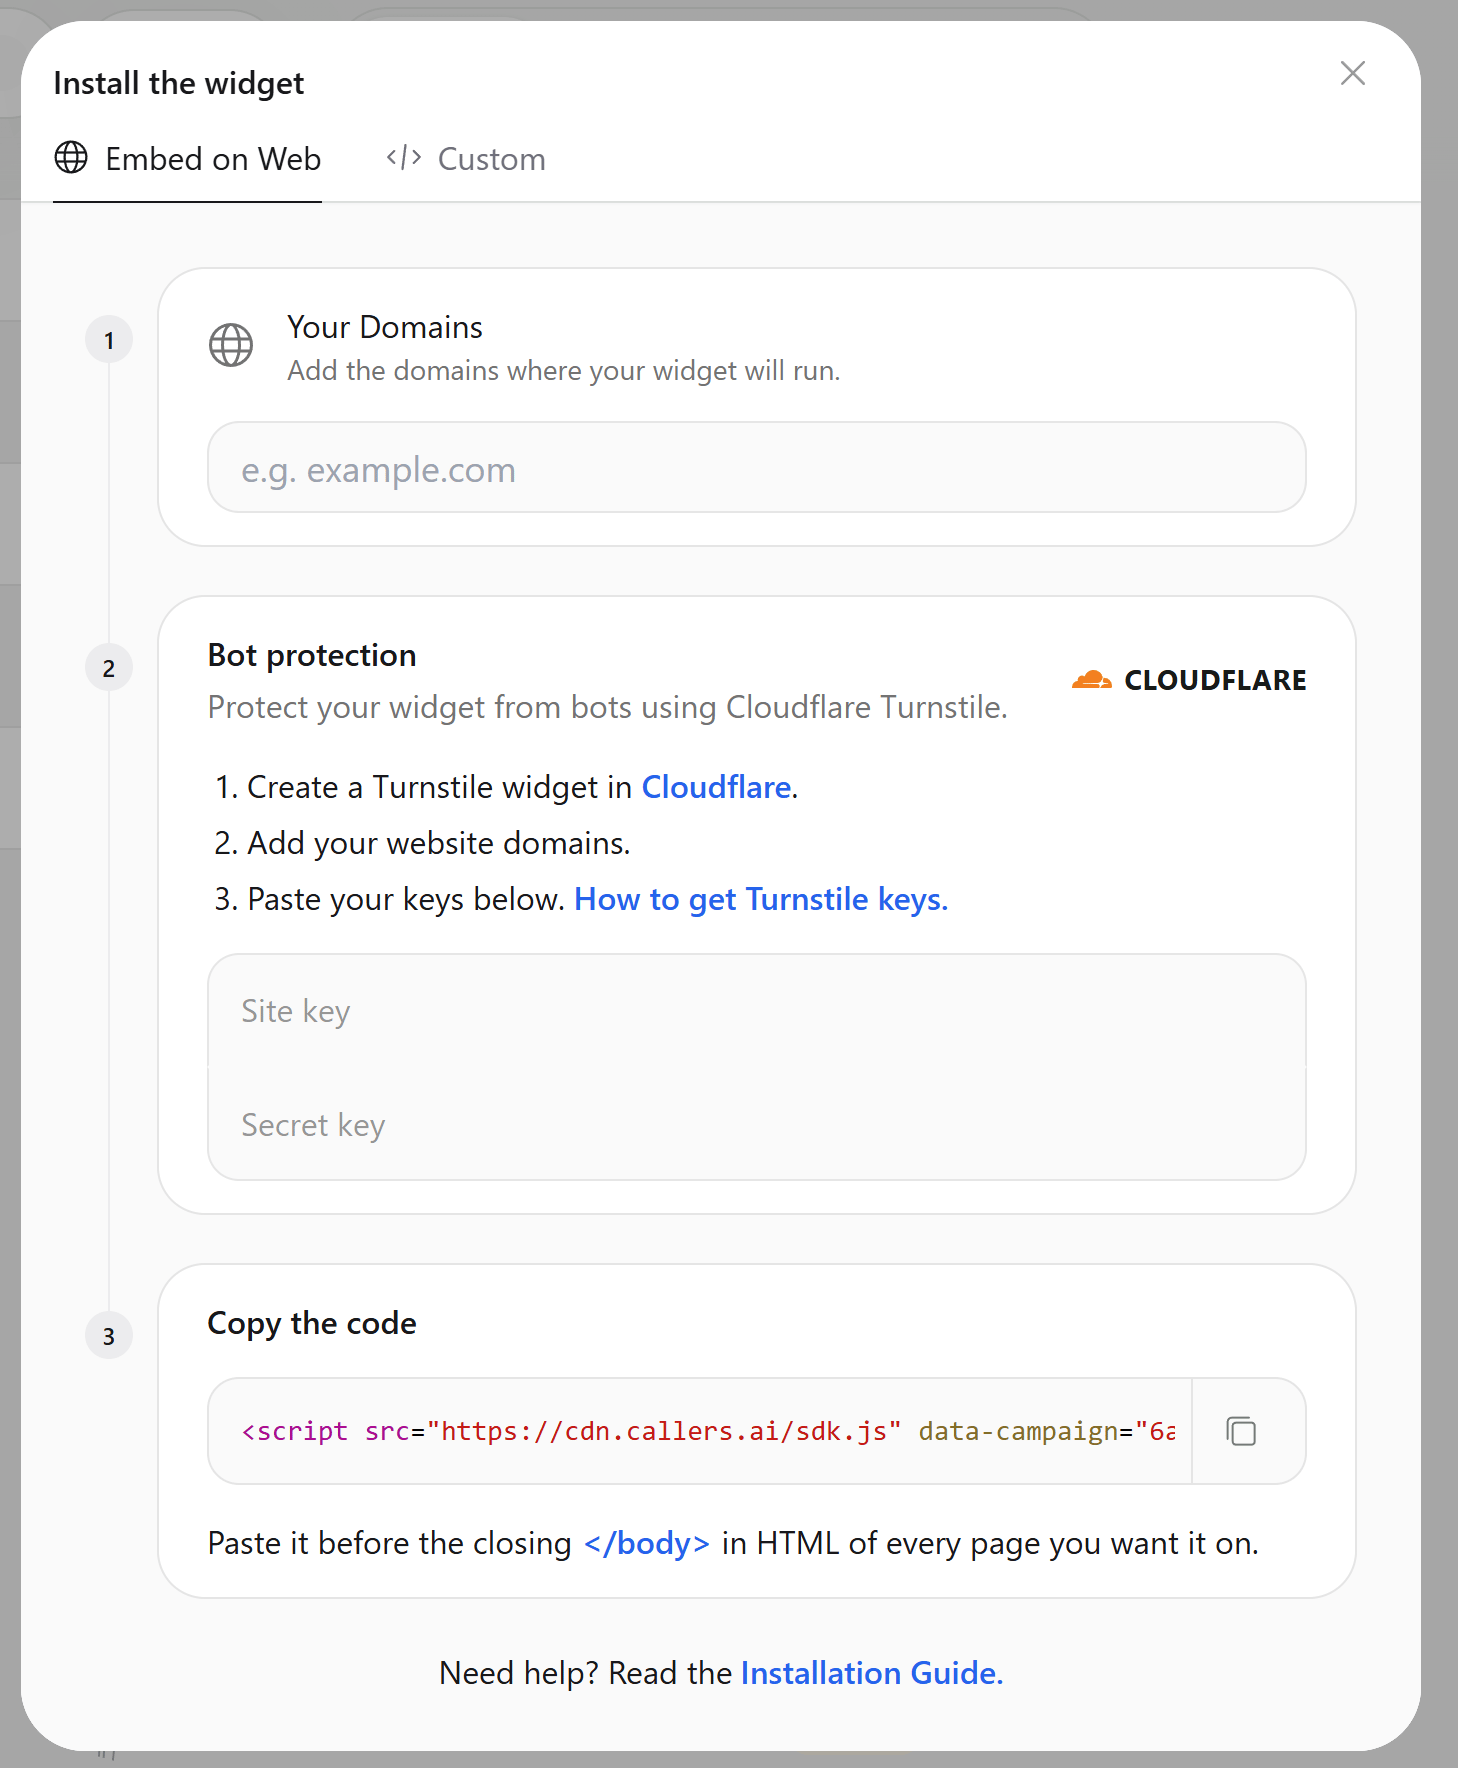 ### 1. Add Your Domains
List every domain the widget is allowed to run on. Type a domain and press **Enter** to add it; each one appears as a removable chip.
This list is a security boundary, not a suggestion. When a visitor opens the widget, Callers checks the page's origin against this list and refuses the conversation if it isn't there.
**Domains are matched exactly.** A few consequences worth knowing before you start:
* **Wildcards are rejected.** `*.example.com` will not be accepted.
* **Subdomains are separate entries.** Adding `example.com` does *not* cover `app.example.com` or `www.example.com` - add each one you actually use.
* **Ports are not stored.** A local address like `localhost:3000` is saved as `localhost`, which will not match a request coming from port 3000. To test locally, use the **Custom** integration with a token instead, since token authentication skips the domain check.
If the list is empty, the widget cannot start a conversation at all - you'll see the error `No allowed origins configured`.
### 2. Bot Protection
Bot protection stops automated traffic from burning through your conversation minutes. Callers uses **Cloudflare Turnstile**, which is free.
Open the [Cloudflare Turnstile dashboard](https://dash.cloudflare.com/?to=/:account/turnstile) and create a new widget.
Enter the same domains you added in the previous step. Cloudflare will only issue challenges for domains listed here.
Cloudflare gives you a **Site key** and a **Secret key**. Paste both into the matching fields in the installer.
**Both keys are required.** Bot protection switches on only when the site key *and* the secret key are filled in - fill in just one and it stays off. The secret key lives in Callers because verification happens on our servers, not in the visitor's browser.
Once enabled, bot protection applies to **both** installation methods - the embed script and the Web SDK. Unlike the domain list, a token does not bypass it.
After a visitor passes a challenge and the conversation ends, they must close and reopen the widget to start another one. This is intentional: each conversation gets its own challenge.
### 3. Copy the Code
Copy the snippet and paste it into your HTML, just before the closing `` tag, on every page where you want the widget to appear.
```html theme={null}
### 1. Add Your Domains
List every domain the widget is allowed to run on. Type a domain and press **Enter** to add it; each one appears as a removable chip.
This list is a security boundary, not a suggestion. When a visitor opens the widget, Callers checks the page's origin against this list and refuses the conversation if it isn't there.
**Domains are matched exactly.** A few consequences worth knowing before you start:
* **Wildcards are rejected.** `*.example.com` will not be accepted.
* **Subdomains are separate entries.** Adding `example.com` does *not* cover `app.example.com` or `www.example.com` - add each one you actually use.
* **Ports are not stored.** A local address like `localhost:3000` is saved as `localhost`, which will not match a request coming from port 3000. To test locally, use the **Custom** integration with a token instead, since token authentication skips the domain check.
If the list is empty, the widget cannot start a conversation at all - you'll see the error `No allowed origins configured`.
### 2. Bot Protection
Bot protection stops automated traffic from burning through your conversation minutes. Callers uses **Cloudflare Turnstile**, which is free.
Open the [Cloudflare Turnstile dashboard](https://dash.cloudflare.com/?to=/:account/turnstile) and create a new widget.
Enter the same domains you added in the previous step. Cloudflare will only issue challenges for domains listed here.
Cloudflare gives you a **Site key** and a **Secret key**. Paste both into the matching fields in the installer.
**Both keys are required.** Bot protection switches on only when the site key *and* the secret key are filled in - fill in just one and it stays off. The secret key lives in Callers because verification happens on our servers, not in the visitor's browser.
Once enabled, bot protection applies to **both** installation methods - the embed script and the Web SDK. Unlike the domain list, a token does not bypass it.
After a visitor passes a challenge and the conversation ends, they must close and reopen the widget to start another one. This is intentional: each conversation gets its own challenge.
### 3. Copy the Code
Copy the snippet and paste it into your HTML, just before the closing `` tag, on every page where you want the widget to appear.
```html theme={null}